

- POP & IMAP: Dovecot IMAP/POP: Comes with Fedore Core, Red Hat Enterprise, CentOS, Ubuntu, ...
- POP:
- ipop3d: University of Washington - Stock Red Hat 6-9 POP server (part of IMAP software release)
There is no formal documentation. Download the Red Hat source RPM (part of imap-2000 source RPM) and review the code for more info. - cucipop [Download] - Very configurable. Better for controlling load and access. - [RPM]
- qpopper - Qualcomm's POP server - [Download]
- GNU pop3d
- ipop3d: University of Washington - Stock Red Hat 6-9 POP server (part of IMAP software release)
- IMAP:
- imap4 - University of Washington
- WU IMAP Server Source Distribution Documentation - Imap server which ships with Red Hat distro - [Info]
- Cyrus: CMU IMAP server
- imap4 - University of Washington
- PWSERVE - Servers for Eudora's Change Password command.
Prerequisites:
It is assumed that the system has:- Networking requirements configured: IP address, routing, internet connectivity, etc. See the YoLinux networking tutorial for maore information.
- DNS MX records defining the mail server. See the YoLinux DNS/bind configuration tutorial
- An appropriate MTA mail server installed such as sendmail. See the YoLinux Mail Transfer Agent (MTA) server software and sendmail configuration tutorial.
Older Red Hat systems came with the University of Washington (WU) release of POP and IMAP. Current Fedora Core, Red Hat Enterprise Linux (4), CentOS (4) Linux distributions are shipped with Dovecot IMAP and POP. Both configurations are covered here:
- Dovecot POP server configuration: (Fedora Core, Red Hat Enterprise Linux, CentOS)
- WU-POP server configuration: (Older Red Hat - pre 9.0)
Required Packages:
- RPM packages (Red Hat, Fedora, CentOS): dovecot, postgresql-libs
See YoLinux Systems Administration tutorial on RPM and YUM package management. - Debian/Ubuntu: apt-get install dovecot-pop3d
Dovecot configuration file examples:
- Red Hat / Fedora: /etc/dovecot.conf
- Ubuntu 8.04: /etc/dovecot/dovecot.conf
Dovecot configurations are shown below for clear text and encrypted password transfer. Using ssl (Secure Socket Layer) will encrypt the entire exchange including password and transfer of email contents.
Any changes to the Dovecot configuration requires that one restart Dovecot to read the new changes.
- OpenSSL Encryption:
First/base file: /etc/dovecot/dovecot.conf
protocols = pop3
listen = *
base_dir = /var/run/dovecot/
dict {
}
!include conf.d/*.conf
File: /etc/dovecot/conf.d/10-auth.confdisable_plaintext_auth = yes auth_mechanisms = plain login !include auth-system.conf.ext
File: /etc/dovecot/conf.d/auth-system.conf.extpassdb { driver = pam } userdb { driver = passwd }This tells Dovecot to use user system logins/passwords. Specify another auth file in auth-system.conf.ext to use a different form of user authentication, eg LDAP, password file, ...
File: /etc/dovecot/conf.d/10-mail.confmail_location = mbox:~/mail:INBOX=/var/mail/%u mbox_write_locks = fcntl
This mailbox configuration specification refers to the Postfix mailbox default location.
File: /etc/dovecot/conf.d/10-ssl.confssl = yes ssl_cert = </etc/pki/dovecot/certs/dovecot.pem ssl_key = </etc/pki/dovecot/private/dovecot.pem
File: /etc/pki/dovecot/dovecot-openssl.cnf[ req ] default_bits = 2048 encrypt_key = yes distinguished_name = req_dn x509_extensions = cert_type prompt = no [ req_dn ] C=US ST=CA L=Gotham OU=mail CN=mail.megacorp.com emailAddress=user@megacorp.com [ cert_type ] nsCertType = server
Use the following command to generate and install the self-signed certificate PEM files using the information from dovecot-openssl.cnf: /usr/libexec/dovecot/mkcert.sh
Proper Certificate Authorities (CA) can optionally be incorporated as well.
Free CA's:Note that the rest of the config files remain as the default installation.
Test from a client system: openssl s_client -connect mail.megacorp.com:pop3s
CONNECTED(00000003) depth=0 C = US, ST = CA, OU = Mail_server, CN = mail.megacorp.com, emailAddress = user@megacorp.com verify error:num=18:self signed certificate verify return:1 depth=0 C = US, ST = CA, OU = Mail_server, CN = mail.megacorp.com, emailAddress = user@megacorp.com verify return:1 --- Certificate chain 0 s:/C=US/ST=CA/OU=Mail_server/CN=mail.megacorp.com/emailAddress=user@megacorp.com i:/C=US/ST=CA/OU=Mail_server/CN=mail.megacorp.com/emailAddress=user@megacorp.com --- Server certificate -----BEGIN CERTIFICATE----- .... .... -----END CERTIFICATE----- subject=/C=US/ST=CA/OU=Mail_server/CN=mail.megacorp.com/emailAddress=user@megacorp.com issuer=/C=US/ST=CA/OU=Mail_server/CN=mail.megacorp.com/emailAddress=user@megacorp.com --- No client certificate CA names sent --- SSL handshake has read 1356 bytes and written 485 bytes --- New, TLSv1/SSLv3, Cipher is DHE-RSA-AES256-GCM-SHA384 Server public key is 1024 bit Secure Renegotiation IS supported Compression: NONE Expansion: NONE SSL-Session: Protocol : TLSv1.2 Cipher : DHE-RSA-AES256-GCM-SHA384 Session-ID: 7B2EC4C079D99.... Session-ID-ctx: Master-Key: CBA54333AA8A0.... Key-Arg : None PSK identity: None PSK identity hint: None SRP username: None TLS session ticket lifetime hint: 300 (seconds) TLS session ticket: 0000 - 4a 36 b4 3f 4d d1 b3 4d-67 e9 44 97 a1 51 e5 f9 J6.?M..Mg.D..Q.. 0010 - ... 0020 - ... 0030 - ... 0040 - ... 0050 - ... 0060 - ... 0070 - ... 0080 - ... 0090 - ... Start Time: 1455434305 Timeout : 300 (sec) Verify return code: 18 (self signed certificate) --- +OK Dovecot ready. quit closed - No Encryption: (trusted network)
These examples are for POP retrieval of email using clear text authentication. Authentication in these examples is against the user logins in /etc/passwd. Advanced configurations are possible, authenticating to a SQL database, LDAP or Dovecot authentication. Dovecot can be configured to use chroot, SSL encryption, limit simultaneous connections, set mailbox and file locations, log formats, set custom greetings, ... etc.
- Dovecot 2.0: (Red Hat EL6+ / CentOS 6+) configuration files for version 2.0+ are divided by purpose
First/base file: /etc/dovecot/dovecot.confprotocols = pop3 listen = * base_dir = /var/run/dovecot/ dict { } !include conf.d/*.confFile: /etc/dovecot/conf.d/10-auth.confdisable_plaintext_auth = no auth_mechanisms = plain !include auth-system.conf.ext
File: /etc/dovecot/conf.d/auth-system.conf.extpassdb { driver = pam } userdb { driver = passwd }This tells Dovecot to use user system logins/passwords. Specify another auth file in auth-system.conf.ext to use a different form of user authentication, eg LDAP, password file, ...
File: /etc/dovecot/conf.d/10-mail.confmail_location = mbox:~/mail:INBOX=/var/mail/%u mbox_write_locks = fcntl
This mailbox configuration specification refers to the Postfix mailbox default location.
File: /etc/dovecot/conf.d/10-ssl.confssl = no
Note that the rest of the config files remain as the default installation. - Dovecot 1.0.7: (Red Hat EL5 / CentOS 5) configuration files in older versions (1.0 and earlier) are in a single configuration file as shown below
protocols = pop3 - Add imap imaps pop3 pop3s to support other protocols protocol imap { } protocol pop3 { } auth default { mechanisms = plain passdb pam { - Uses PAM configuration in /etc/pam.d/dovecot } userdb passwd { - Uses local login/password file /etc/passed } user = root - required for pam based authentication } dict { } plugin { } - Dovecot 1.0.10: (Ubuntu 8.04)
protocols = pop3 listen = * ssl_disable = yes - Set to "no" to use without SSL/TLS certificate and private key disable_plaintext_auth = no log_timestamp = "%Y-%m-%d %H:%M:%S " # Grant access to these extra groups for mail processes. Typical use would be # to give "mail" group write access to /var/mail to be able to create dotlocks. # depricated mail_extra_groups = mail mail_privileged_group = mail protocol imap { } protocol pop3 { pop3_uidl_format = %08Xu%08Xv - Dovecot's default. Can be set to mimic other POP servers } auth default { mechanisms = plain passdb pam { } userdb passwd { - Uses local login/password file /etc/passed } user = root - required for pam based authentication } plugin { } - Dovecot 0.99.13: (Fedora 3)
protocols = pop3          - Change only this line. Rest of file stays as default (FC3)
imap_listen = [::]        - IPV-6 interfaces
pop3_listen = [::]
imaps_listen = [::]
pop3s_listen = [::]
ssl_cert_file = /usr/share/ssl/certs/dovecot.pem
ssl_key_file = /usr/share/ssl/private/dovecot.pem
login_dir = /var/run/dovecot-login
login = pop3
mbox_locks = fcntl
auth = default
auth_mechanisms = plain
auth_userdb = passwd
auth_passdb = pam
auth_user = root

...
...
This configuration will use system logins to authenticate POP. It will allow one to retrieve mail from the default mail repository on the mail server: /var/mail/user-id
- Dovecot 2.0: (Red Hat EL6+ / CentOS 6+) configuration files for version 2.0+ are divided by purpose
[Potential Pitfall]: Mailbox permissions misconfiguration.
Error in /var/log/maillog
Error: chown(/home/user1/mail/.imap/INBOX, -1, 12(mail)) failed: Operation not permitted (egid=501(user1), group based on /var/mail/user1)
Error: mkdir(/home/user1/mail/.imap/INBOX) failed: Operation not permitted
Error: Couldn't open INBOX: Internal error occurred. Refer to server log for more information. [2016-02-13 08:19:15]
Couldn't open INBOX top=0/0, retr=0/0, del=0/0, size=0
The Dovecot configuration references the location of the user mailbox directory. In this case it is the Postfix default location as defined in the Dovecot config file: /etc/dovecot/conf.d/10-mail.conf
...
....

mail_location = mbox:~/mail:INBOX=/var/mail/%u

....
...
This configuration is correct but the directory permissions were not:
was: -rw-rw----
Fix: chmod 0600 /var/spool/mail/*
now: -rw-------
Note that the more permissive settings caused the error!
[Potential Pitfall]: Dovecot upgrade where directive mail_extra_groups = mail is depricated. Substitute: mail_privileged_group = mail
[Potential Pitfall]: If using NFS to share mail files, use Dovecot v1.1 or later.
Dovecot was written by a security guru to be unpenetrible by hackers. Dovecot supports both Unix mbox and Maildir formats.
Start "dovecot" service:
- Red Hat/Fedora/CentOS: service dovecot start
- Debian/Ubuntu: /etc/init.d/dovecot start
Links:
This POP configuration tutorial is specific to the ipopd/imap University of Washington release which ships with Red Hat 6-9.
Typically POP is controlled by the xinetd (Red Hat 7.x) or inet (Red Hat 5.x,6.x) daemon. To activate the POP system, the service must be available as follows:
- The network port must be defined for POP in the /etc/services file:
pop3            110/tcp         pop-3           # POP version 3
pop3            110/udp         pop-3
Note that some ot the other pop servers require that the service be named pop3 and NOT pop-3 as used here by the U of Washingto pop3d server. Both names are defined here.
- inet/xinetd configuration:
- xinetd (Red Hat 7.x): The service is defined by the file: /etc/xinetd.d/ipop3.
To turn the service on:- Edit the line and change from the default:
disable = yes
TO:disable = no
OR - Execute the command: chkconfig ipop3 on
This command also restarts the xinetd process.
- Edit the line and change from the default:
- inetd (Red Hat 6.x and older): The service must be defined in the /etc/inetd.conf file:
pop-3 stream tcp nowait root /usr/sbin/tcpd ipop3d
By default, the RedHat installation may have a "#" at the beginning of the line to comment out the definition. Remove the "#" to define the service.
- xinetd (Red Hat 7.x): The service is defined by the file: /etc/xinetd.d/ipop3.
- Restart the inet daemon to re-read the configuration file and enable the service.
- xinetd (Red Hat 7.x):
/etc/rc.d/init.d/xinetd restart
- inetd (Red Hat 6.x and older):
/etc/rc.d/init.d/inet restart
- xinetd (Red Hat 7.x):
If the accounts are e-mail only and you wish to refuse logins, change the assigned shell in the /etc/passwd file to /bin/false or see the YoLinux web server configuration tutorial coverage of basic user security and disabling logins.
By default the user login and password are the same as the system login and password. This configuration is generally a bad idea as all the text is transfered over the network in clear text (not encrypted) The idea gets even worse when you think that this basic configuration uses system login and passwords which match the pop3 login and password. The login (mailtest) and password (supersecret) are clearly visible. Check out the tcp stream captured below:
Alternate Authentication - APOP: Using a CRAM-MD5 data file.
This method is much better and I highly recommend this method.
Taking the following steps to create the CRAM-MD5 authentication database file:
- touch /etc/cram-md5.pwd
- chmod 0600 /etc/cram-md5.pwd : Password are held in the file as plain ascii text, thus protect file from unauthorized viewers.
- Add to the file a user entry of the form: user-id <TAB> password
Lines begining with the character '#' are considered comments.
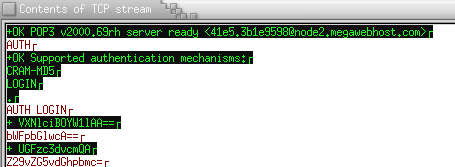
For each user in the /etc/cram-md5.pwd file, there must also be an entry in the /etc/passwd file. The password used by ipop3d will be the password held in this CRAM-MD5 data file and not the system login password. While they can be the same I recomend that the user have no system login password assigned but assign an ipop3 password in the file /etc/cram-md5.pwd. Also note the following EtherReal packet sniffing session listening in on the exchange between Netscape Messenger and ipop3d (U Washington). The authentication of login and password are NOT clear text!!
- A system user must still be added for every e-mail user. (Use the useradd command.)
- The mere presence of the file /etc/cram-md5.pwd and its contents turns on this APOP authentication feature. Nothing else needs to be configured for ipop3d to enter this mode.
- No browser settings in Netscape Communicator/Messenger are required to invoke CRAM-MD5 authentication. It is strictly a server configuration which is negotiated with the client.
- Once in this authentication mode the browser will assume encryption. I ran a test where I deleted the /etc/cram-md5.pwd file and packet sniffed the tcp stream for a regular system user. The login/password exchange was still encrypted! I then pointed my browser to my ISP which uses clear text and the authentication sceme reverted to clear text and stayed in this mode when going back to the regular user on my server. The only way to get the system to invoke the encryption mode was to revert back to using CRAM-MD5 authentication.
WU-IMAP configuration: (Red Hat 6-9)
Typically IMAP are controlled by the inet daemon. To activate the IMAP system, the service must be available as follows:
- The network port must be defined in the /etc/services file:
imap2           143/tcp         imap            # Interim Mail Access Proto v2
imap2           143/udp         imap
- inet / xinetd configuration:
- xinetd (Red Hat 7.x): The service is defined by the file: /etc/xinetd.d/imap. To turn the service on, edit the line and change from the default:
disable = yes
TO:
disable = no
- inetd (Red Hat 6.x and older): The service must be defined in the /etc/inetd.conf file:
imap stream tcp nowait root /usr/sbin/tcpd imapd
By default, the RedHat installation may have a "#" at the beginning of the line to comment out the definition. Remove the "#" to define the service.
- xinetd (Red Hat 7.x): The service is defined by the file: /etc/xinetd.d/imap. To turn the service on, edit the line and change from the default:
- Restart the inet daemon to re-read the configuration file and enable the service.
- xinetd (Red Hat 7.x):
/etc/rc.d/init.d/xinetd restart
- inetd (Red Hat 6.x and older):
/etc/rc.d/init.d/inet restart
- xinetd (Red Hat 7.x):
- Mail recieved by the MTA sendmail, is held in the directory/file: /var/spool/mail/system-user-id
All mail is held in a single file in "Mail Box" format. - RSA private key and certificate: /usr/share/ssl/certs/imapd.pem
- SSL and imapd - Excellent coverage of current U of Washington imap-2000 release distributed with Red Hat 7.1 - by Shane Chen
- RFC 1939 - POP V3 - Post Office Protocol
- RFC 2449 - POP3 Extension Mechanism
- RFC 1957 - POP3 - Observations on Implementations
- RFC 3501 - IMAP - Internet Message Access Protocol - Version 4rev1
- RFC 1733 - Distributed Electronic Mail Models in IMAP4
- RFC 2180 - IMAP4 Multi-Accessed Mailbox Practice.
 Books:
 |
"IMAP"
by Dianna Mullet, Kevin Mullet ISBN #059600012X, O'Reilly & Associates
|

|