The most common type of panoramic photography is cylindrical panoramic photography. This stitches overlapping images from photos taken in a single plane of rotation. A full 360 degree or partial rotation can be made. Spherical panoramic imagery adds the vertical plane and covers a view in all directions, like Google "Street View".
Cylindrical projections: There are various projections which can be categorized under this term. Cameras, lenses and viewpoints will not give a true and exact cylindrical projection due to distortion in the vertical or longitudinal direction with distortion occurring near the poles. This limits the range to typically 120 degrees. Some variations of cylindrical projection are: Mercator projection, Miller projection, Equirectangular projection, Lambert cylindrical equal area, Pannini projection. See the following article for more on panoramic image projections.
Spherical projections: This form of projection eliminates the distortion of straight lines at the poles. While these are represented by distortion free rectilinear images (multiple flat images tangent to a sphere), the entire sphere is not displayed as a single image.
This tutorial will cover the display of panoramic photography using Javascript or a JQuery plugin for display on the web. A stitched panoramic image is often too large for a display on a web page so a JQuery or Javascript widget can be used to scroll an image as if one is looking around. Note that this is NOT video, Flash, a Java applet or Quicktime, just a very wide image with which the user can interact, to view in all directions, delivering an immersive experience.
JQuery Plugins:
- 360 degree:
- Reel [demo]
My favorite. Allows image annotation, use of mobile gyro and auto-rotation. Complete user control of viewing. - PanoScroll (demo only. View source to obtain jquery.panoScroll-v1.3.js plugin, css and to view example source)
Rotates at directed speed. User can turn on/off rotation. Limited user interaction. - JQuery Pano [demo] - user directed rotation
- Cyclotron (GitHub)
Like the viewer above except that the movement can maintain momentum of the spin. Quick response. - Panorama_viewer (GitHub) [demo] - user directed rotation
- jQuery-html5-canvas-panorama-plugin (GitHub)
- Panorama 360
commercial for a fee per use. User directed rotation as well as controls for auto rotation start/stop. Uses mouse wheel.
- Reel [demo]
- Panoramic Image Viewers:
- JQuery PhotoNav (demo)
Quick and responsive to user interaction. Also used for menu navigation.
- JQuery PhotoNav (demo)
Javascript only Viewers:
- JSPanoViewer - Rectilinear (< 179 degrees) and Pannini / Vedutismo projections (> 300 degrees longitude)
- Panorando [demo]
HTML5 (slow and not good in all browsers)
The Reel JQuery plugin is used for viewing a full 360 degree cylindrical panoramic image. The rotation is continuous and can continuously rotate in either direction. This plugin also allows for image annotation which will rotate with the image. This is a feature rich plugin and is my favorite for full 360 degree display.
Requires http://code.vostrel.cz/jquery.reel.js
Source:
<html>
<head>
<script src="http://code.jquery.com/jquery-1.9.1.min.js" type="text/javascript"></script>
<script src="jquery.reel.js" type="text/javascript"></script>
</head>
<body>
...

<img src="Panorama-3_900x350.jpg" width="900" height="350"
      class="reel"
      id="image"
      data-image="Panorama-3_2125x350.jpg"
      data-stitched="2125"
      data-speed="0.01"
      data-orientable="true"/>

...
</body>
</html>
- data-image: image to be used for the panorama
- data-speed: speed in revolutions per second (Hz). Animation is disabled by default (0).
- data-stitched: Pixel width of stitched panorama image.
- data-orientable: true/false - Enables interaction via device's built-in gyroscope (if available).
- data-responsive: true/false - will obey dimensions of its parent container, will resize.
- data-frame: 1 to 36 - Start frame (integer). Default is 1. This allows you to start in a different position without editing the image.
- data-frames: 36 - Number of frames (integer) in a full rotation. Default is 36.
- see Reel home page for more options
Demo of the Reel 360 panoramic image viewer
Adding annotations:
<span class="reel-annotation headline"
     id="headline"
      data-x="160"
      data-y="20"
      data-for="image">
      Hermosa Beach Volleyball
</span>

<a class="reel-annotation"
      href="http://www.hermosabch.org"
      id="hermosa_pier"
      data-x="1800"
      data-y="100"
      data-for="image">
      Hermosa Pier
</a>
Add the annotations in the HTML "body", after the "img" tag.
The determination of data-x and data-y is described below.
<head>
...

<style>
      #image-reel{ font-size: 85%; }
      #image-reel .reel-annotation { color: #4a5567; white-space: nowrap; font-weight: bold; font-size: 148%; color: #4a5567; cursor: help; }
      #image-reel a.reel-annotation { color: #4a5567; }
      #image-reel .headline.reel-annotation { font-size: 280%; opacity: 0.5; color: white; cursor: inherit; }
      #image-reel a.headline.reel-annotation { color: white; }
</style>
</head>
Demo of an annotated panoramic image
Annotation location:
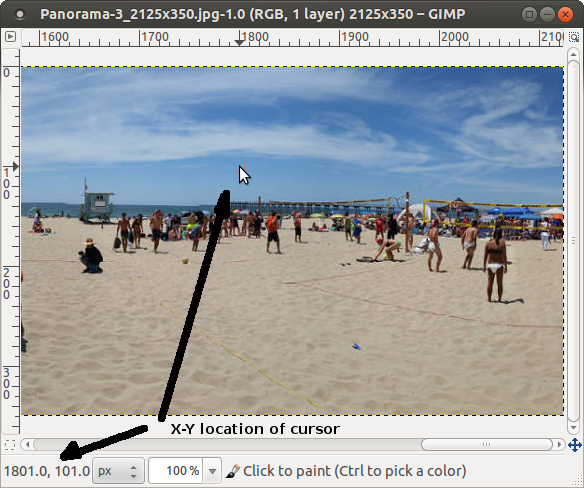
Use a graphics program (in this case Gimp) to locate text position.
The "Hermosa Pier" text was located by placing the cursor in the location desired and reading the coordinates. Adjustments can be then be made incrementally.
This panoramic viewer is not continuous in rotation but terminates at the end of the photo and is thus suited for panoramic images which do not cover the full 360 degree rotation. This plugin id activated with mouse movement only (you don't have to press any mouse buttons). It responds quickly to user mouse movements.
Download: jqueryphotonav.zipContains:
- css/photonav.css (if used, it requires editing based on your display window and image size)
- js/photonavjQuery.js
Source:
<html>
<head>
<script src="http://code.jquery.com/jquery-1.9.1.min.js" type="text/javascript"></script>
<script src="js/photonavjQuery.js" type="text/javascript"></script>
<style type="text/css">
<!--
.photonav .photo {
        clear: both;
        overflow: hidden;
        border: 1px solid gray;
        margin: 20px;
        width: 600px;
}

.photonav .photo .pano {
        height: 600px;
        background-image: url(panorama_photo.jpg);
}
-->
</style>
</head>
<body>
...

<div id="photonav" class="photonav">
<div id="photo" style="display: none;" id="navigate">
<div class="fixed pano">
</div>
</div>

<script type="text/javascript">
$("#navigate").css({"display":"block"});
PhotoNav.init("navigate",600,2571,false);
</script>

</div>
...
</body>
</html>
- CSS .photonav .photo: defines the viewport display width
- CSS .photonav .photo .pano: defines the height of the viewport and the panoramic photo to be used in the "url" statement.
- Either will work:
- $("#navigate").css({"display":"block"});
- document.getElementById("navigate").style.display="block";
- The javascript function call to PhotoNav.init(arg1,arg2,arg3,arg4):
- First argument is the id of the div container
- Second argument is the width in pixels of the container
- Third argument is the full width in pixels of the panoramic image
- Fourth argument is true/false for the debug mode.
If using debug mode add the following:<div id="status"> </div>
Spherical panoramic images are of a size ratio of 2:1 reflecting the 360x180 degree viewing range. For a list of image stitching tools for spherical panoramic photography, see the YoLinux.com tutorial Spherical Panoramic imagery tools.
The next step in the tool chain is to present the stitched image on the web. A list of these tools are presented below. It seems that the commercial tools have only a slight advantage as they provide a complete working tool chain from individual images to web presentation in either Adobe Flash or HTML5/Javascript. The open source alternative matches the viewer capability but requires the integration of separate viewers.
- Spherical Panoramic Viewers (FOSS):
- OpenPano.org: SaladoPlayer: convert and display
- OpenStudio spherical panoramic: no media generation tools or guidelines. Viewer only.
- VrHabitat.org: VR5 Javascript/HTML5 panorama viewer. iPad and iPhone only. Requires that you refer to a Flash or alternate viewer for other platforms.
- Pannellum: HTML5, CSS3, JavaScript, and WebGL (not ready for prime time. Display gaps.)
- Leandigo: HTML5, CSS3 with a JQuery plugin. Not ready for prime time (distorted).
- Spherical Panoramic Viewers (Commercial):
- KRpano.com: available as Flash and HTML5 applications
KRpano Tools used to put image into a viewing format. Gigapixel support. - Syborg: Flash or HTML5 depending on platform
- Kolor: PanoTour (Commercial and based on KrPano viewer) Complete tool chain. Gigapixel support
- Pano2VR: complete tool chain
- KRpano.com: available as Flash and HTML5 applications
This free open source player is Flash based web viewer for cubic, equirectangular (spherical), cylindrical and QTVR panoramas. The viewer is configured using XML. This is typically used with SaladoConverter (a cross platform Java program) to convert a stitched image into a format usable by the SaladoPlayer.
It is typical to use SaladoPlayer (Flash) as the default player with a VR5 (see tutorial below) solution for iPhone and iPad mobile devices.
SaladoConverter:
Home Page: SaladoConverter (GitHub)
Download SaladoConverter (GitHub)
unzip  SaladoConverter-0.5.zip
cd SaladoConverter-0.5
java -jar -Xmx5g SaladoConverter.jar
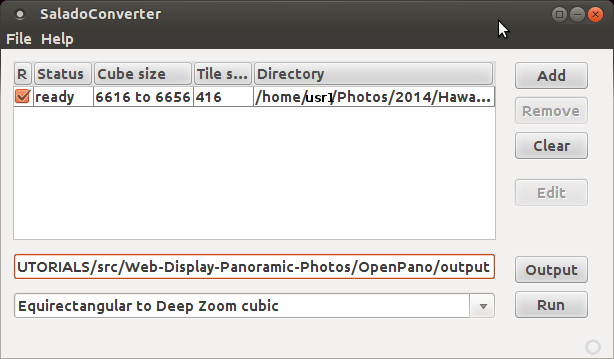
The SaladoConverter GUI conversion options:
- Equirectangular to Deep Zoom cubic (choose this option)
- Cubic to Deep Zoom cubic
- Equirectangular to cubic
- Cubic to resized cubic
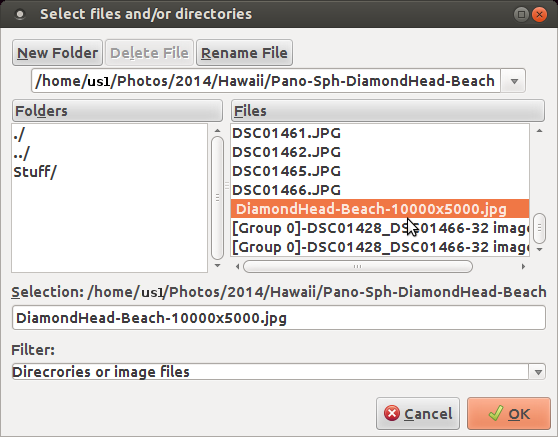
File selection
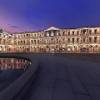
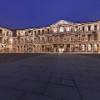
Stitched panoramic image in spherical projection
Select the "Run" button to process.
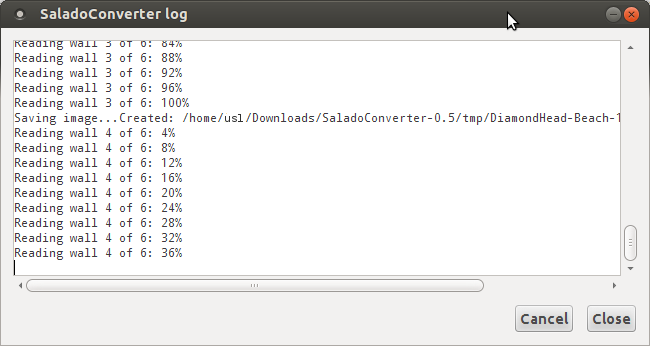
Log viewer (File + Show Log)
The end of the log should state "DONE".
The result is to generate a directory of the name "dz" + the image name, in the output directory specified. SaladoPlayer will populate the directory with a hierarchy of directories and tiled images of various resolutions, used by the viewer.
[Potential Pitfall]: memory limit exceeded
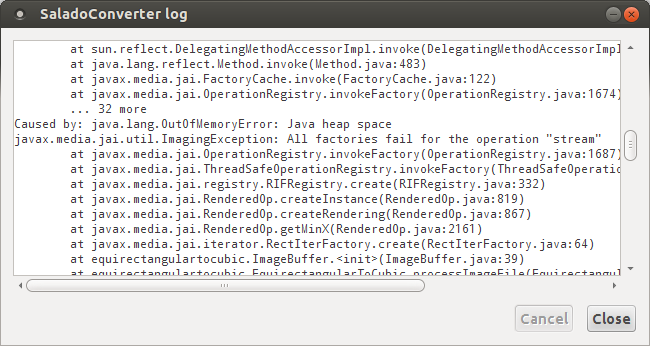
Java heap space errors can be fixed by starting with a smaller image or raising the command line heap limit.
This failed on my first attemp with an image over 20,000 pixels wide and 5 Gb of heap.
SaladoPlayer:
Home Page: OpenPano.org: SaladoPlayer
Download SaladoPlayer-X.X.X.zip and unzip.
The SaladoPlayer download will unzip into a deployable framework for the display of spherical panoramic photography on the web. Add the directory generated by SaladoConverter and edit the SaladoPlayer XML file: bn.xml to point to the image content output/dzimage-file-name/image-file-name_f.xml data information file.
SaladoPlayer directory hierarchy: (unzipped)
-
SaladoPlayer-1.3.5/_examples/  - extra stuff
SaladoPlayer-1.3.5/index.html
SaladoPlayer-1.3.5/_manual/    - HTML manual for SaladoPlayer
SaladoPlayer-1.3.5/modules/
SaladoPlayer-1.3.5/_projects/
SaladoPlayer-1.3.5/spots/
SaladoPlayer-1.3.5/tours/      - examples of linked tours
SaladoPlayer-1.3.5/viewer/

index.html                     - Web page of panoramic
output/dz_DiamondHead-Beach-10000x5000/              - SaladoConverter generated content
output/dz_DiamondHead-Beach-10000x5000/panoinfo.xml  - User must generate this
File: index.html<html> <head> <meta http-equiv="Content-Type" content="text/html; charset=utf-8"/> <script type="text/javascript" src="SaladoPlayer-1.3.5/viewer/embed/swfobject.js"></script> <script type="text/javascript"> var flashvars = {}; flashvars.xml = "output/dz_DiamondHead-Beach-10000x5000/panoinfo.xml" var params = {}; params.menu = "false"; params.quality = "high"; params.allowfullscreen = "true"; swfobject.embedSWF("SaladoPlayer-1.3.5/viewer/SaladoPlayer-1.3.5.swf", "SaladoPlayer", "100%", "100%", "10.1.0", null, flashvars, params); </script> </head> <body> <div id="SaladoPlayer"/> </body> </html>
File: panoinfo.xml<SaladoPlayer> <global debug="false"> <control autorotation="delay:600"/> <panoramas firstPanorama="front"/> </global> <panoramas> <panorama id="front" path="output/dz_DiamondHead-Beach-10000x5000/DiamondHead-Beach-10000x5000_f.xml"/> </panoramas> <modules> <ImageButton path="SaladoPlayer-1.3.5/modules/imagebutton/ImageButton-1.3.swf"> <button id="help" path="SaladoPlayer-1.3.5/tours/_media/images/misc/help.png" action="toggleHelp"> <window align="vertical:middle,horizontal:right" open="true" onOpen="onOpenHelp" onClose="onCloseHelp"/> </button> </ImageButton> <ButtonBar path="SaladoPlayer-1.3.5/modules/buttonbar/ButtonBar-1.3.swf"> <window align="horizontal:center"/> <buttons path="SaladoPlayer-1.3.5/modules/buttonbar/skins/buttons_dark_40x40.png"> <button name="out"/> <button name="in"/> <button name="drag"/> <button name="autorotation"/> <button name="fullscreen"/> <extraButton name="e" action="helpToggle"/> </buttons> </ButtonBar> <MouseCursor path="SaladoPlayer-1.3.5/modules/mousecursor/MouseCursor-1.3.swf"> <settings path="SaladoPlayer-1.3.5/modules/mousecursor/skins/cursors_21x21.png"/> </MouseCursor> </modules> <actions> <action id="mapOpen" content="ImageMap.setOpen(true)"/> <action id="mapClose" content="ImageMap.setOpen(false)"/> <action id="mapOpened" content="ImageButton.setOpen(buttonMap,false)"/> <action id="mapClosed" content="SaladoPlayer.waitThen(0.5,openButtonMap)"/> <action id="openButtonMap" content="ImageButton.setOpen(buttonMap,true)"/> <action id="menuOpen" content="MenuScroller.setOpen(true)"/> <action id="menuClose" content="MenuScroller.setOpen(false)"/> <action id="menuOpened" content="ImageButton.setOpen(buttonMenu,false)"/> <action id="menuClosed" content="SaladoPlayer.waitThen(0.5,openButtonMenu)"/> <action id="openButtonMenu" content="ImageButton.setOpen(buttonMenu,true)"/> <action id="hideBubble" content="InfoBubble.hide()"/> <action id="showBubble_bFront" content="InfoBubble.show(bFront)"/> <action id="showBubble_bP1" content="InfoBubble.show(bP1)"/> <action id="showBubble_bP2a" content="InfoBubble.show(bP2a)"/> <action id="showBubble_bP2b" content="InfoBubble.show(bP2b)"/> <action id="showBubble_bInterior" content="InfoBubble.show(bInterior)"/> <action id="showBubble_bPassage" content="InfoBubble.show(bPassage)"/> <action id="toggleHelp" content="ImageButton.toggleOpen(help)"/> <action id="onOpenHelp" content="ButtonBar.setActive(e,true)"/> <action id="onCloseHelp" content="ButtonBar.setActive(e,false)"/> </actions> </SaladoPlayer>SaladoPlayer HTML manual
Article on SaladoThis HTML5/Javascript based spherical panoramic viewer targeted for the iPhone and iPad. VR5 seems to be a solution for Apple mobile products only and used to supplement an Adobe Flash deployment. VR5 is actually coded to be used with a Flash player like SaladoPlayer for most platforms while defaulting to VR5 HTML5/Javascript solution for iPhones and iPads.
VR5 relies on photos stitched and configured in a 6 sided cube configuration of two resolutions of 1024px and 480px in the order of front (0), right (1), back (2), left (3), top (4), down (5).


Front 0 Right 1 Back 2 Left 3 Top 4 Down 5 VrHabitat Home Page [Download: vr5.zip]
VR5 can be configured to operate with SaladoPlayer for non iPhone and iPad mobile devices.
File: index.htmlWhere OpenPano/altPage.html is the Flash SaladoPlayer page.<html> <head> <meta http-equiv="Content-Type" content="text/html; charset=utf-8"/> <script type="text/javascript" src="vr_files/config.js"></script> <script type="text/javascript"> function redirect(){ if ((navigator.userAgent.match(/iPhone/i)) || (navigator.userAgent.match(/iPod/i))) { window.location.replace('vr5/iphone.html');} else if (navigator.userAgent.match(/iPad/i)) { window.location.replace('vr5/ipad.html');} else {if (flashPage==null) { flashPage= 'OpenPano/altPage.html';} if (flashPage.length == 0) {document.write('<div style="display:block;padding: 1em;margin: 10% auto;border: solid 4px red;background: #f88;color: black;text-align: center;font: bold 18px Arial, Helvetica, sans-serif;width: 80%;">This content requires iPad/iPhone/iPod Touch</div>');} else {window.location.replace('OpenPano/altPage.html');}} } </script> </head> <body onLoad="redirect();" style="margin:0; padding:10px;"> <a style="display:none; visibility:hidden;" href="http://www.vrhabitat.com/" title="HTML5 / JavaScript panorama viewer">HTML5 / JavaScript panorama viewer</a> </body> </html>Demo: iPhone or iPad only
KrPano is a commercial licensed product used to generate spherical panoramic "virtual tours" from one or more stitched images in a spherical projection.
KrPano Home Page [download note: without a license, results are watermarked]
Download and Install: krpano-1.18-linux64.tar.gzcd /opt sudo tar xzf krpano-1.18-linux64.tar.gz # Generate drag-and-drop icons (optional) cd /opt/krpano-1.18 ./INSTALL\ -\ Create\ Linux\ Desktop\ Icons.sh cp /opt/krpano-1.18/MAKE\ VTOUR\ \(MULTIRES\)\ droplet.desktop ~/Desktop
Generate a spherical panoramic image by dragging and dropping a stitched image onto the icon or by executing the following command:
/opt/krpano-1.18/krpanotools makepano -config=/opt/krpano-1.18/templates/vtour-multires.config panoramic-image.jpgAn alternative is to drag and drop the stitched panoramic image onto the drag-and-drop icon.
Stitched panoramic image in spherical projectionKrPano will generate a directory: vtour/ with two HTML files:
- vtour/tour.hmtl - page to publish. Demo version watermarks final product.
- vtour/tour_editor.html - allows one to edit the start position and linking together multiple panoramic images into a virtual tour. (Write protected - you can't actually edit this vtour).
KrPano Tools:
-
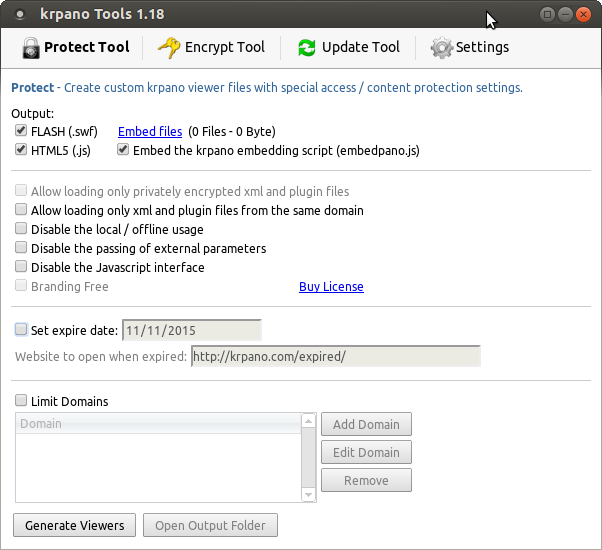
Protect tab: set web security options
This is a commercial licensed product used to take one or more stitched images in a spherical projection and generate Flash and HTML5 web media. Panotour uses licensed KrPano technology for its viewer. Panotour Pro is required to support VR formats.

[Potential Pitfall]: Panotour Pro 2.5.8 upgrade - Installation fails:
..
Errors were encountered while processing:
 PanotourPro_Linux64_258_2017-06-28.deb
Fix: First remove, then re-install:sudo dpkg -r PanotourPro sudo dpkg -i PanotourPro_Linux64_258_2017-06-28.deb
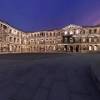
Examples of spherical panoramic photography
- Transformations and Projections - Paul Bourke
 Books:

"jQuery in Action"
by Bear Bibeault and Yehuda Katz
ISBN # 1935182323, Manning Publications