Jenkins can monitor your CM system to detect a check-in of Java source code. Upon recognition of this change, Jenkins will update a local working directory of code and perform a series of build steps (e.g. "ant clean", "ant compile"). See our Jenkins installation and configuration tutorial.
This tutorial will cover the installation, configuration and use of tools, Jenkins plug-ins and their configuration to support the unique tools used for Java software development. There are a plethora of Java tools to auto-generate documents, perform unit tests, code reviews and execution code coverage. We will cover the most prominent tool for each and their integration with Jenkins Continuous Integration (CI). All builds in this tutorial will be driven by Apache Ant
Other related YoLinux.com Tutorials:
Jenkins CI should generate web based auto-docs. Use Javadoc to generate HTML documents from source code and its comments. This is a native plugin which comes with Jenkins thus no installation is required. Configuration is required.
This example shows the basic Unix/Linux start script used to launch Jenkins. All configuration options in this example are set with environment variables and command line arguments:
- Install "Javadoc":
- Javadoc comes with the Java SDK. See the YoLinux Java JDK Installation Tutorial
- Install Javadoc plugin:
- Native plugin. Comes with Jenkins.
- Configure Jenkins System:
In the section "Global Properties" + "Environment Variables", add to your PATH:- name: JAVA_HOME
- value: /opt/java/latest
- name: PATH
- value: $JAVA_HOME/bin:$PATH
- Jenkins Project Configuration:
- Select your build job from the Jenkins home page.
- Select "Configure" (top left hand side of page)
- At the bottom of page under "Post-build Actions" select the "Publish Javadoc" option.
- Set Javadoc directory: build/javadoc

- Select the "Save" button to save this configuration.
- Configure Build:
- Shell Script:
export PATH=$PATH:/opt/java/latest/bin javadoc -d build/javadoc -sourcepath ProjectX/trunk/JavaApp/src - Ant: Add target "javadoc"
(add to build.xml)
File: build.xml... ... <property name="src.dir" value="./src"/> <property name="javadoc.dir" value="${build.dir}/javadoc"/> <target name="javadoc" description="Documentation generation" > <mkdir dir="${javadoc.dir}"/> <javadoc access="public" destdir="${javadoc.dir}" author="true" version="true" use="true" windowtitle="ABC Corp JavaApp"> <fileset dir="${src.dir}" defaultexcludes="yes"> <include name="**/*.java" /> <exclude name="test/**/*.java" /> </fileset> </javadoc> </target> ... ...
- Shell Script:
- Build Display:
Select "Javadoc" link to view documentation.
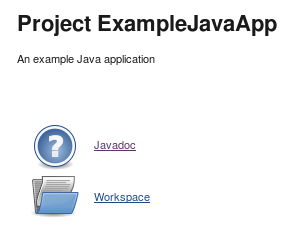
Javadoc plugin location: /var/lib/jenkins/plugins/javadoc.hpi
FindBugs is used to find bad coding practices or potentially unintended behavior in Java code.
This is a list of FindBugs bug descriptions that will be searched.
- Install FindBugs:
- Home page: http://sourceforge.net/projects/findbugs/
- Download: findbugs-3.0.0.tar.gz
- Install:
cd /opt
tar xzf findbugs-3.0.0.tar.gz
User environments can add the following to their ~/.bashrcif [ -d /opt/findbugs-3.0.0/ ] then export FINDBUGS_HOME=/opt/findbugs-3.0.0 PATH=$FINDBUGS_HOME/bin:$PATH fiFindBugs can run as a GUI tool (java -jar $FINDBUGS_HOME/lib/findbugs.jar) or from the command line as shown by our Ant script: build.xml
- Install Jenkins FindBugs Plugin:
- Select from the Jenkins (start page) + "Manage Jenkins" + "Manage Plugins". Now select the "Available" tab and select the FindBugs Plugin.
- Select the "Install and Restart Jenkins" button.
- FindBugs Plugin Info
- Ant build:
To add support for the Ant FindBugs XML tags, add the findbugs-ant.jar file to the Apache Ant library:
ln -s /opt/findbugs-3.0.0/lib/findbugs-ant.jar /opt/apache-ant-1.8.2/lib/findbugs-ant.jarAdd the following to your Ant build.xml file:
Note:<taskdef name="findbugs" classname="edu.umd.cs.findbugs.anttask.FindBugsTask"/> ... ... <property name="findbugs.home" value="/opt/findbugs-3.0.0"/> <property name="build.dir" value="./build" /> <property name="src.dir" value="./src" /> ... ... <target name="findbugs" depends="jar"> <findbugs home="${findbugs.home}" output="xml" outputFile="findbugs.xml" effort="max"> <auxClasspath path="/opt/java/lib/junit-4.9b2.jar" /> <sourcePath path="${src.dir}" /> <class location="${base.dir}/${app.jar}" /> </findbugs> </target>- The "taskdef" tag defines support for the Ant tag "findbugs".
- The "sourcePath" is the source code to be examined. Jar file dependencies are also listed.
- Jenkins Configuration:
Enter the FindBugs "outputFile" which the plug-in will read to display results.
- Results:
Select the "FindBugs Trend" chart to view the details: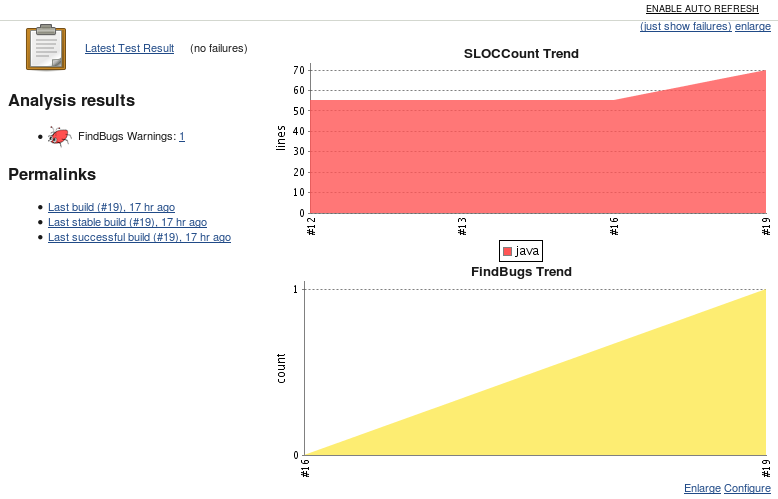
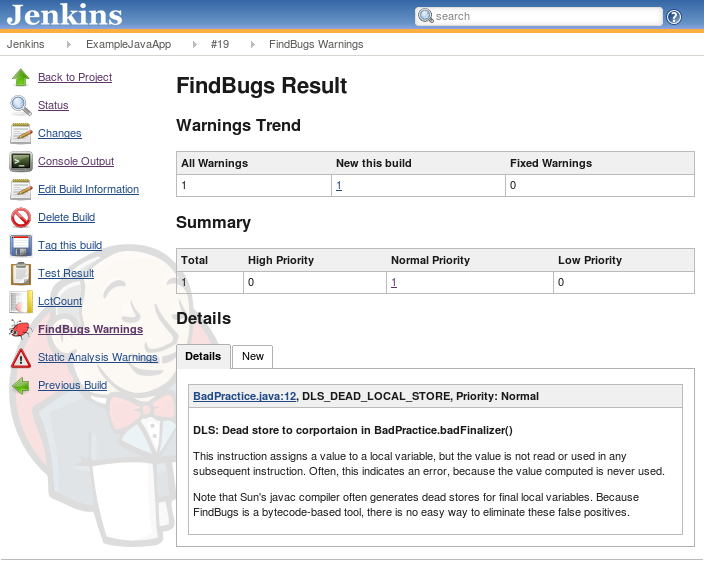
This plugin reports the number of Java compiler warnings and errors over time. This plugin can be used to generate a plot. No extra software is required as it just reports extra information about your Java build.
- Install Jenkins Warnings Plugin:
- Select from the Jenkins (start page) + "Manage Jenkins" + "Manage Plugins". Now select the "Available" tab and select the Compiler Warnings Plugin.
- Select the "Install and Restart Jenkins" button.
- Warnings Plugin Info (scans Java and C++ console logs for warnings)
- Jenkins Configuration:
Select "Add" (Scan console log), then specify your compiler (in this case javac)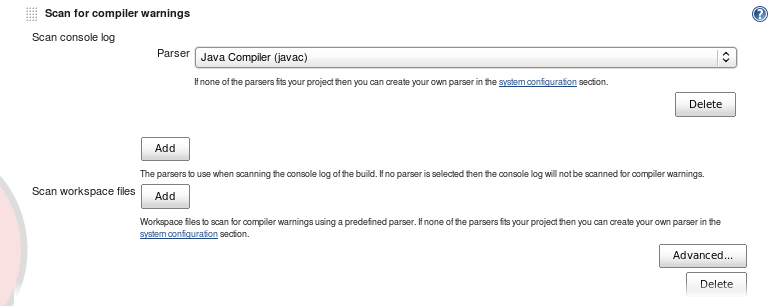
- Results:
Plot of the number of compiler warnings (in this case none)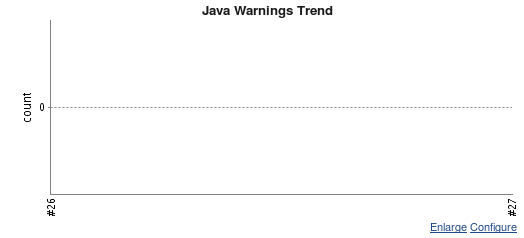
When compiling with Apache Ant, warnings are supressed by default. It is required that one use the following Java compiler flag (-Xlint:all) to generate Java warnings which can be plotted by the Jenkins Warnings Plugin. This can be added using the following XML in your build file.
Apache Ant Build File: build.xml (snippet)
...
...

     <target name="compile">
         <javac srcdir="src/main/java" destdir="classes" fork="yes">
             <compilerarg line="-Xlint:all"/>
             <classpath refid="classpath"/>
         </javac>
     </target>

...
...
When compiling with Maven, warnings are supressed by default. It is required that one use the compiler plugin for Maven to generate Java warnings which can be plotted by the Jenkins Warnings Plugin. This can be added using the following XML in your POM file.
Maven Build File: pom.xml (snippet)
...
...

     <build>
         <plugins>
            <plugin>      <!-- Unit Test -->
                <groupId>org.apache.maven.plugins</groupId>
                <artifactId>maven-surefire-plugin</artifactId>
                <version>2.20</version>
                <configuration>
                    <redirectTestOutputToFile>true</redirectTestOutputToFile>
                </configuration>
            </plugin>
            <plugin>      <!-- Warnings -->
                <groupId>org.apache.maven.plugins</groupId>
                <artifactId>maven-compiler-plugin</artifactId>
                <version>3.0</version>
                <configuration>
                    <source>1.8</source>
                    <target>1.8</target>
                    <compilerArgument>-Xlint:all</compilerArgument>
                    <showWarnings>true</showWarnings>
                    <showDeprecation>true</showDeprecation>
                </configuration>
            </plugin>
         </plugins>
     </build>
OR
use the following which keeps the POM Netbeans friendly. The compiler argument directive is not Netbeans friendly and can be injected to the pom.xml file as a Jenkins property which is not viewed by Netbeans when building from the POM file.
Jenkins project configuration:
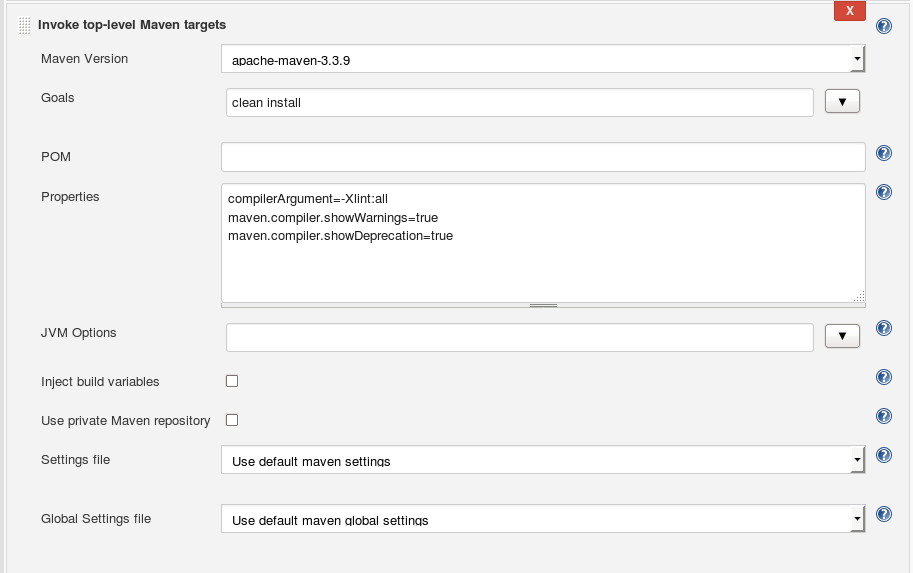
Note that the Jenkins "Property "compilerArgument" matches the name used as the variable set in the POM.
Maven Build File: pom.xml (snippet)
...
...

     <build>
         <plugins>
            <plugin>      <!-- Unit Test -->
                <groupId>org.apache.maven.plugins</groupId>
                <artifactId>maven-surefire-plugin</artifactId>
                <version>2.20</version>
                <configuration>
                    <redirectTestOutputToFile>true</redirectTestOutputToFile>
                </configuration>
            </plugin>
            <plugin>      <!-- Warnings -->
                <groupId>org.apache.maven.plugins</groupId>
                <artifactId>maven-compiler-plugin</artifactId>
                <version>3.0</version>
                <configuration>
                    <compilerArgument>${compilerArgument}</compilerArgument>
                </configuration>
            </plugin>
         </plugins>
     </build>

     <properties>
       <maven.compiler.source>1.8</maven.compiler.source>
       <maven.compiler.target>1.8</maven.compiler.target>
       <maven.jar.plugin>2.3.2</maven.jar.plugin>
       <project.build.sourceEncoding>UTF-8</project.build.sourceEncoding>
       <junit.version>4.12</junit.version>
     </properties>

...
...
This POM file is Netbeans friendly because the variable "${compilerArgument}" does not get substituted for "Xlint:all" which suspends Netbeans scrolling during the build process. It will however be used during the Jenkins build.
JUnit is supported natively by Jenkins so there is no extra plug-in installation, just configuration.
- JUnit Installation:
- See the YoLinux JUnit Tutorial for download and installation instructions as well as coding with JUnit.
- Ant build:
File: build.xml (snippets)
<?xml version="1.0" encoding="UTF-8"?> <project name="projx" default="all" basedir="."> <description>Builds, tests, and runs projx</description> <property name="build.dir" value="./"/> <property name="src.dir" location="${build.dir}/src"/> <property name="test.dir" location="${build.dir}/test/src"/> <property name="test.htmlreports.dir" location="${build.dir}/test/htmlreports"/> <property name="test.data.dir" location="${build.dir}/test/data"/> <property name="junit.class.name" value="com.megacorp.projx.JUnit.AllTests"/> ... ... <path id="classpath.junittest"> <path refid="classpath.base" /> <pathelement location="/opt/java/lib/junit-4.9b2.jar" /> <pathelement location="${test.dir}" /> </path> ... ... <target name="test" depends="compile-test"> <mkdir dir="${test.data.dir}"/> <mkdir dir="${test.htmlreports.dir}"/> <junit fork="no" haltonfailure="no" showoutput="yes" printsummary="true"> <test name="${junit.class.name}" todir="${test.data.dir}"/> <formatter type="brief" usefile="false"/> <formatter type="xml"/> <classpath refid="classpath.base" /> <classpath refid="classpath.src" /> <classpath refid="classpath.junittest" /> </junit> <junitreport todir="${test.htmlreports.dir}"> <fileset dir="${test.data.dir}"> <include name="TEST-*.xml"/> </fileset> <report format="frames" todir="${test.htmlreports.dir}"/> </junitreport> </target> <target name="all" depends="compile-test" /> </project> - Jenkins Configuration:
Configuration must match the "todir" directory of the JUnit test output.
- JUnit Results:
JUnit chart of sucessful tests. Increase is due to the addition of new tests.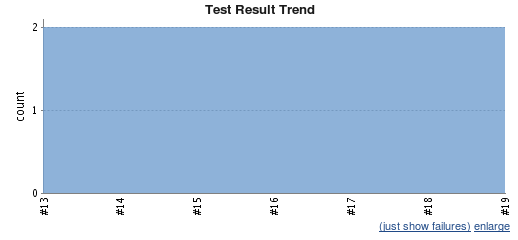
Click on the JUnit chart to view details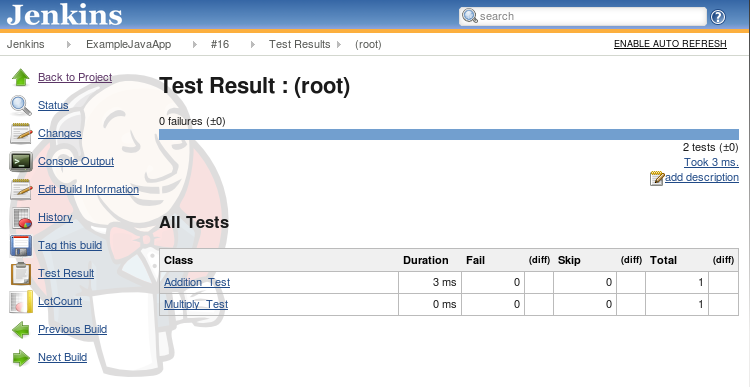
JUnit HTML Results Report: ./test/htmlreports/index.html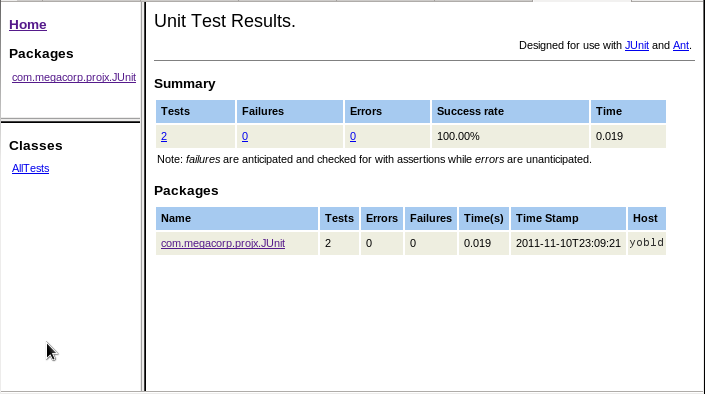
For a full tutorial on the use of Maven with JUnit, see the Yolinux JUnit tutorial
Configure Jenkins to point to the JUnit test results:
Use the Jenkins Maven plug-in rather than executing Maven as a shell command. The Maven plug-in is Maven aware and will post-process JUnit results for use with Jenkins. Select your Jenkins project and "Configure":
Configure Build Project JUnit reporting:Test results will be put into the following directory structure:

- Install "JaCoCo":
- JaCoCo Home Page
- Download jacoco-0.7.2.201409121644.zip
- Install:
mkdir /opt/JaCoCo
cd /opt/JaCoCo
unzip path-to-file/jacoco-0.7.2.201409121644.zip
- Install JaCoCo plugin:
- Select from the Jenkins (start page) + "Manage Jenkins" + "Manage Plugins". Now select the "Available" tab and select the JaCoCo Plugin.
- Select the "Install and Restart Jenkins" button.
- JaCoCo Plugin info
- Configure Build:
- Ant configuration: build.xml
Note that the "taskdef" defines the JaCoCo Ant tags and the Jar file to provide this functionality. Alternatively this Jar file could be added to the Ant lib/ directory.
...
...
    <property name="junit.class.name" value="AllTests"/>
    <property name="test.data.dir" location="${build.dir}/test/data"/>
    <property name="test.htmlreports.dir" location="${build.dir}/test/htmlreports"/>

    <taskdef uri="antlib:org.jacoco.ant" resource="org/jacoco/ant/antlib.xml">
         <classpath path="/opt/JaCoCo/lib/jacocoant.jar"/>
    </taskdef>
...
...
    <target name="test" depends="compile-test">
      <mkdir dir="${test.data.dir}"/>
      <mkdir dir="${test.htmlreports.dir}"/>
      <jacoco:coverage destfile="jacoco.exec">
        <junit fork="true" forkmode="once" haltonfailure="no" showoutput="yes" printsummary="true">
          <test name="${junit.class.name}" todir="${test.data.dir}"/>
          <formatter type="brief" usefile="false"/>
          <formatter type="xml"/>
          <classpath refid="classpath" />
        </junit>
      </jacoco:coverage>
      <junitreport todir="${test.htmlreports.dir}">
        <fileset dir="${test.data.dir}">
          <include name="TEST-*.xml"/>
        </fileset>
        <report format="frames" todir="${test.htmlreports.dir}"/>
      </junitreport>
    </target>

...
...
Wrap whatever you want to run, JUnit tests or just code execution with the following:<jacoco:coverage destfile="jacoco.exec"> ... ... </jacoco:coverage>
The binary output file jacoco.exec is used by the plugin. For Jacoco HTML reports accessed by the sidebar link plugin run the following:Jacoco report URL: http://localhost/jenkins/job/ExampleJavaApp/ws/jacoco/index.html... ... <property name="jacoco.report.dir" location="${base.dir}/jacoco"/> <property name="build.dir" value="./build" /> <property name="src.dir" value="./src" /> ... ... <target name="jacoco-report" depends="compile-test"> <!-- Step 3: Create coverage report --> <jacoco:report> <!-- This task needs the collected execution data and ... --> <executiondata> <file file="jacoco.exec"/> </executiondata> <!-- the class files and optional source files ... --> <structure name="JaCoCo Report"> <classfiles> <fileset dir="${build.dir}"/> </classfiles> <sourcefiles encoding="UTF-8"> <fileset dir="${src.dir}"/> </sourcefiles> </structure> <!-- to produce reports in different formats. --> <html destdir="${jacoco.report.dir}"/> <csv destfile="${jacoco.report.dir}/report.csv"/> <xml destfile="${jacoco.report.dir}/report.xml"/> </jacoco:report> </target> ... ...
- Ant configuration: build.xml
- Jenkins Plugin Configuration:
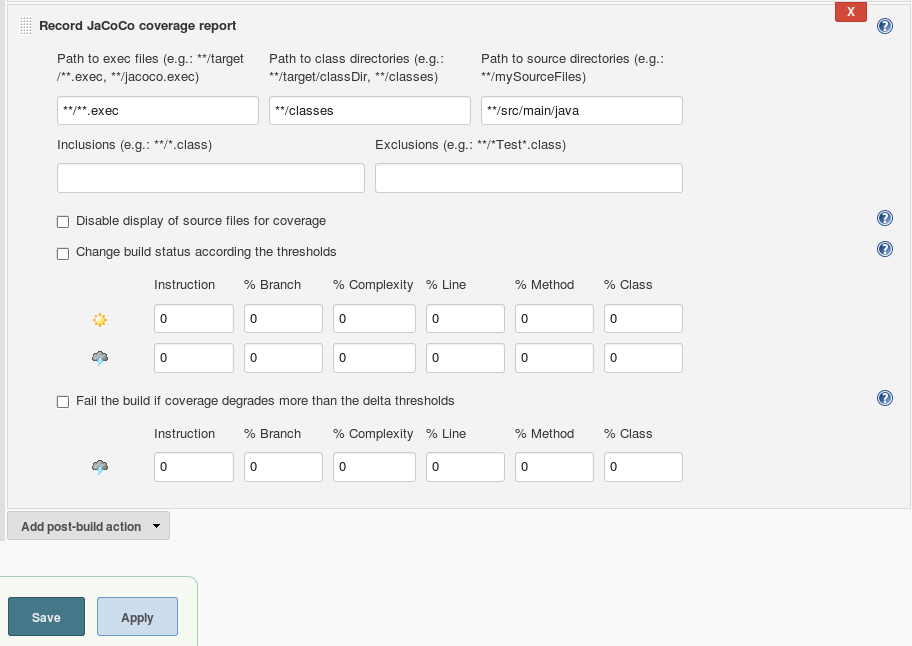
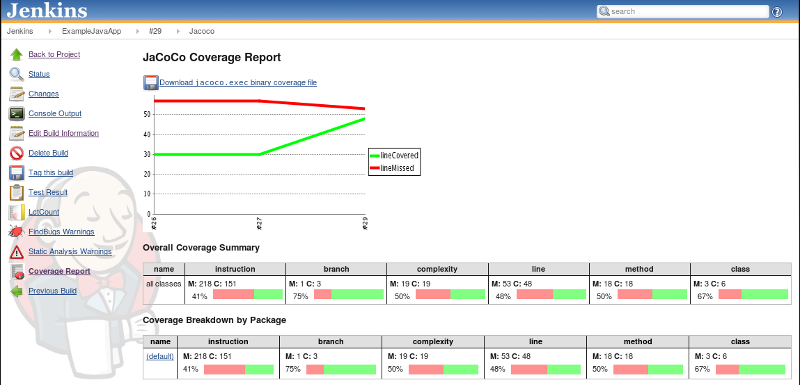
Turn on report generation: For the Jenkins project, select "Configure" + "Add post-build action" (bottom of page) + "Record JaCoCo coverage report" + "Apply". The following entry form will be available:
Direct JaCoCo to use use the binary output file (jacoco.exec), and Java source and compiled class files. Code coverage limits can be set to determine if the build is considered a pass or fail. Set to zero if code coverage will not be used to determine if the build is a pass or fail.
Select the "Save" button to save this configuration. - Build Display:
Select graph plot to view details. If the build and test runs are successful, the "Overall Coverage Summary" of percentages will be posted.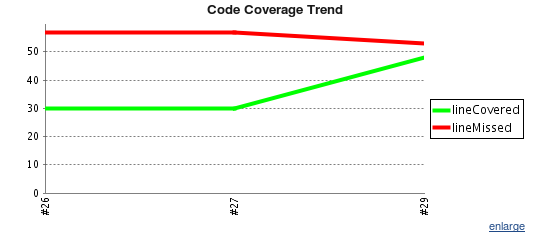
Maven Build File: pom.xml (snippet)
...
...

     <build>
         <plugins>
            <plugin>      <!-- Unit Test -->
                <groupId>org.apache.maven.plugins</groupId>
                <artifactId>maven-surefire-plugin</artifactId>
                <version>2.20</version>
                <configuration>
                    <redirectTestOutputToFile>true</redirectTestOutputToFile>
                </configuration>
            </plugin>
            <plugin>      <!-- Code Coverage -->
                <groupId>org.jacoco</groupId>
                <artifactId>jacoco-maven-plugin</artifactId>
                <version>0.7.9</version>
                <executions>
                  <execution>
                    <goals>
                      <goal>prepare-agent</goal>
                    </goals>
                  </execution>
                  <execution>
                    <id>report</id>
                    <phase>prepare-package</phase>
                    <goals>
                      <goal>report</goal>
                    </goals>
                  </execution>
                </executions>
            </plugin>
         </plugins>
     </build>

     <properties>
       <maven.compiler.source>1.8</maven.compiler.source>
       <maven.compiler.target>1.8</maven.compiler.target>
       <maven.jar.plugin>2.3.2</maven.jar.plugin>
       <project.build.sourceEncoding>UTF-8</project.build.sourceEncoding>
       <junit.version>4.12</junit.version>
     </properties>

...
...
Jenkins project post-build JaCoCo configuration:
Also see the Jenkins JaCoCo plugin home page
 |
Continuous Integration: Improving Software Quality and Reducing Risk
(Paperback) by Steve Matyas, Andrew Glover Addison-Wesley Professional
|

|
 |
Jenkins: The Definitive Guide
(Paperback) by John Ferguson Smart O'Reilly Media (July 27, 2011) Java development focus. |

|
 |
Better Software Magazine
Free subscription for software professionals who care about quality. Each issue brings you relevant, timely information to help you build better software. Continuing to deliver in-depth articles on testing, tools, defect tracking, metrics, and management. |
Free Subscription |


 Books: